In my previous post you probably saw that seeds start growing, so to be consistent with my ideas I am now making a planter to transplant everything on my deck once my herbs are ready. I was running out of shipping pallet but found this pine wood that is designed to be a fence. For around $1 each piece, this planter will cost me no more that $4 and will be free if you have a shipping pallet!

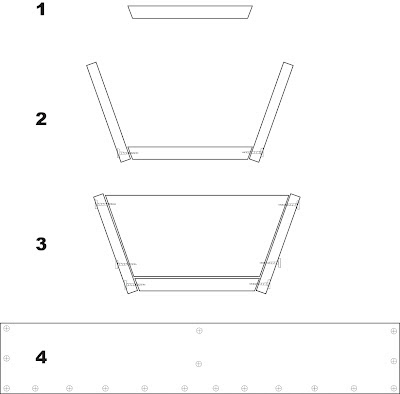
I decided that my planter would have a tiny angle on each side (12 degres) but you don't have to if you want to keep everything really simple (1)
To create the angle I used a table saw and set up the angle.
(2) After cutting the three pieces of wood at the same length (5 feet) I was already at the assembling stage. I attached the side panels using a pre drill hole and then used deck screws (1 1/4 long). I did only one hole in the side panel and made sure the first screw was properly done, then the rest of the holes are really easy.
(3) Once the sides are installed you just have to make the ends of the planter. You'll use the extra pieces of wood you have left and draw directly on the wood the shape needed to close the planter on each end. I added an extra piece in the middle of the planter but this is not necessary. I used my jigsaw to cut the little pieces but the table saw could have done it too.
(4) This is the side view of the planter and where the screws should be.
The last step is to stain your planter, in my case I used the deck stain I had left, but if the planter turn bad after the summer, it will be easy and cheap to replace it!
I'm also planning on using plastic liner inside but I'm still not sure about the advantage of it, just let me know if you have an advice.


i m just looking for the blogs... i found it here.. thnx for sharing.
ReplyDeletevinyl fence panels
Its a great pleasure reading your post.Its full of information I am looking for and I love to post a comment that "The content of your post is awesome" Great work. Fence Installation
ReplyDelete