My model is largely inspired from the only one I found online made by Bruno Gavira.
But there's no tutorial available on how to make it.
So let's start from the begining. To make this balance bike, You need a 3 inch diameter PVC pipe that you need to cut using a coping saw.
Using a heat gun, it's fairly simple to slightly flatten the back of the frame by putting pressure with a piece of wood for few minutes.
At this point I realized that the wheel put to much pressure on the PVC and the plastic need to be reinforced by pieces of metal (found at the deck section at home depot) that I riveted (riveter cost 15$ and it's really useful to have one!)
For the fork, it just like playing Lego, nothing complicated, you just have to find elbow and T (3/4 inch diameter)
The only tricky part is to flatten the end of the fork using once again a heat gun (10$ by the way)
You just squeeze the end with a piece of wood once the plastic start being flexible (around 1 min with a heat gun) and wait around 1 min to get the temperature to cool down.
Heating PVC with a heat gun is probably not a safe idea and might release nasty molecules, so I recommend to do this step far away from your little ones.
The handle bar does not need any heating, just one more T connectors.
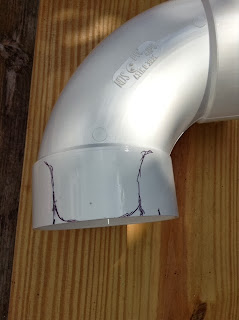
The mudguard is made from a 90 degres 4 inch connector and slighly shaped at the base with the heat gun. The strong connection is made with rivets.
The saddle is made with a 3 inch pipe heated and shaped to fit the bottom of my little one by putting pressure with my feet.
The saddle is also riveted on the front and the back side.
All the pipes needs to be secured with PVC cement.
Now let's have fun!!!!


