Wednesday, July 23, 2014

Upcycling cardboard into Ironman!

Kai-Xiang Xhong is a student who created plenty of sculptures using cardboard. One of the most amazing creation is an Iron Man suit. It took him a year during his free time, to create the suit...
Just have a look.


Kai-Xiang Xhong with his creation.

Tuesday, March 25, 2014

A pallet furniture with shelves

After a long break, the blog is back on track now, with plenty of projects.


This is one made from shipping pallet to fit a specific space and without blocking an electric panel. It is used to put coffee mugs and food related items that are forbidden in a laboratory.


You'll notice that the door handles remind the lab, they are made of tubes with colored liquid inside!


 We made this furniture in the lab, sanding and painting was not possible, so we decided to keep a rustic look.

The frame of the furniture was made using the pocket hole kreg jig:

I love this tool!


Thursday, December 12, 2013

Turning whisks into kitchen lights

Found here
LED technology allows access to new creation in  light design, this is a fun design, the door is open for crazy creations now.

Friday, December 6, 2013

A console table made from pallets

found here
Very simple with a nice finish using staining and polyurethane for the glossy look.

Wednesday, November 6, 2013

PVC pipes upcycled into a balance bike!


This is probably my biggest upcycling in terms of energy spent and thinking. It's not an easy upcycling when you start from scratch, but I'm hoping to guide you through the main step if you want to give yourself a try.
My model is largely inspired from the only one I found online made by Bruno Gavira.
But there's no tutorial available on how to make it.
So let's start from the begining. To make this balance bike, You need a 3 inch diameter PVC pipe that you need to cut using a coping saw.
Using a heat gun, it's fairly simple to slightly flatten the back of the frame by putting pressure with a piece of wood for few minutes.


At this point I realized that the wheel put to much pressure on the PVC and the plastic need to be reinforced by pieces of metal (found at the deck section at home depot) that I riveted (riveter cost 15$ and it's really useful to have one!)

For the fork, it just like playing Lego, nothing complicated, you just have to find elbow and T (3/4 inch diameter)

The only tricky part is to flatten the end of the fork using once again a heat gun (10$ by the way)


You just squeeze the end with a piece of wood once the plastic start being flexible (around 1 min with a heat gun) and wait around 1 min to get the temperature to cool down.
Heating PVC with a heat gun is probably not a safe idea and might release nasty molecules, so I recommend to do this step far away from your little ones.
The handle bar does not need any heating, just one more T connectors.


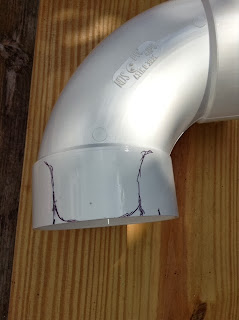
The mudguard is made from a 90 degres 4 inch connector and slighly shaped at the base with the heat gun. The strong connection is made with rivets.

 The saddle is made with a 3 inch pipe heated and shaped to fit the bottom of my little one by putting pressure with my feet.

The saddle is also riveted on the front and the back side.

 All the pipes needs to be secured with PVC cement.

 
I could not find old wheels so I bought some for 6$ each and used bolts and nuts to attach the wheels. I do not give all the details to build the bike, but the main steps are described.

Now let's have fun!!!!


Tuesday, October 29, 2013

Upcycling a laser pointer into a digital microscope

I recently found on Instructables.com, a way of making a microscope using a cell phone or an Ipod touch. I wanted to give a try myself, but wanted to make it "more portable" but maybe not so fancy.

The only thing you really need is a lens from a laser pointer, and magically, I had an old broken one that I kept for no reason..... until today.

I unscrew the tip of the laser pointer and here it is:
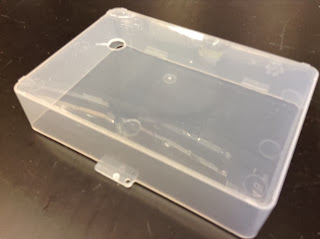
 At this stage, the only thing you need to do is to make a hole in a piece of plastic to hold this tiny lens:

You just have to put your cell phone on the top of it:


To focus properly, you can put the object on the tip of a bottle, like this and hold the box up and down to get the best picture:

And this is the results:

Wthout the lens:
With the lens, you get roughly 10X magnification if you campare the 2 pictures.


Hours of fun with my kids from now! Send me pictures if you have some.


Tuesday, October 22, 2013

Furnitures made with carton boxes

Found here (in french only)
The corrugated carton is a great source of decoration when used properly on the furniture.

Found here
From this spanish studio

There are more and more places where you can buy furniture like these.


Monday, October 7, 2013

Sculpting with piano parts...

Allen Christian's makes sculpture from everyday's life objects. Here is a set of sculptures made from piano parts:

His work is vsible now at the American Visionary Arts Museum in Baltimore titled “Human, Soul and the Machine: The Coming Singularity.”


Monday, September 30, 2013

Spoon chandelier

A chandelier made with spoons, by Daisuke Hirawa. Each spoon has hundreds of holes to let the light goes through.

Tuesday, September 17, 2013

Recycling/upcycling thrift store painting

I think this concept is based on a wonderful idea: adding monsters or funny characters to paintings that inspires no interest for most of us.
I must admit, you have to be gifted to do that, but at the end, this is a really fun project that could end up in kids bedroom instead of a trash.
This is some painting made by Chris Mc Mahon


A different style, made by Thyrza with prints available here on Etsy:


This is really inspiring, and I'm reading to go to thrift store and get my own painting to give it a try!

Wednesday, August 14, 2013

A fold-up pallet desk


One more shipping pallet project, but this one does not need any disassembling, only sanding, staining and adding a piece of plywood with hinges to make the desk. Very ingenious to save space.